Here is a HelloWorld sample on the new ASP.NET Charting control.
To begin with, install the free Microsoft Chart Controls and the "Tools for VS 2008 for Chart Controls" from here and here
Note that if you don’t install the Tools for VS 2008 for Chart controls, the Chart Server Control doesnt show up in the Toolbox
Once you are done with the installation, restart Visual Studio if you are already running the same (of course, save your work)
1. Start Visual Studio 2008 and create a File – New – ASP.NET Website or a Web Application
2. From the ToolBox, under Data tab, pick up the “Chart” control (the icon would be a series of colored bar graphs) and drag and drop it into the page.
3. Click on the smart tag for configuring the Chart control and Choose DataSource
4. Select “Database” and provide the connection string to your database server (in my case I chose Northwind)
5. Choose to save the connection string etc., and select the Database table (in my case I chose “Category Sales for 1997”)
6. Click “Finish” to complete the process.
7. Now if you run the page you will NOT get the Chart Control.
8. You need to select the Properties of the Chart Control from design view.
9. Make sure under “Data” DataSource is set to “SqlDataSource1” unless you gave a different name and DataMember is set to “DefaultView”
10. Under “Series” in Properties, click on the tab to open up the “Series Collection Editor”.
11. Scroll down the Series1 Properties to DataSource section.
12. Specify “CategoryName” as the XValueMember and “CategorySales” for YValueMembers and click Ok.
13. Build the page and hit F5 to run the page.
14. You will be able to see the Chart in your webpage.
15. Right Click on the chart and you would be able to see that it is an image generated dynamically that can be saved as a “.png” file.
You can download a comprehensive list of samples from here and verify the different implementations and source code for the same. For more details, visit the forums here
Thursday, December 11, 2008
Monday, December 8, 2008
Microsoft develops open-source content-management system
Microsoft has developed and released via its CodePlex site an alpha version of a new open-source content-management system, codenamed “Oxite.”
Microsoft made the Oxite source code available for download on December 5. Oxite is available under the Microsoft Public License (MS-Pl), one of its OSI-certified open-source licenses.
From Microsoft’s description of Oxite:
“Oxite provides you with a strong foundation you can build upon - pingbacks, trackbacks, anonymous or authenticated commenting (with optional moderation), gravatar support, RSS feeds at any page level, support for MetaWebLog API (think Windows Live Writer integration made easy), web admin panel, support for Open Search format allowing users to search your site using their browser’s search box, and more - so, you can spend time on designing a great experience.”
Microsoft is positioning Oxite as more than just a blogging engine, claiming it can support even large Web sites. The company also is positioning the platform as customizable, allowing users to swap out Microsoft technologies, like database and search providers — specifically, SQL Server and Live Search — for non-Microsoft ones.
The Oxite content-management platform is “built to take full advantage of ASP.NET MVC but broken into assemblies so that even ASP.NET WebForm developers can use the data backend and utility code, supports use of Visual Studio Team Suite (DB Pro, Test, etc.), and Background Services Architecture (sending trackbacks, emails, etc. all done as a background process to prevent delays on the web site itself),” according to the Softies.
In searching for information on Oxite, I noticed a few folks wondering aloud why Microsoft felt a need to develop another content-management system, given that SharePoint Server provides content-management functionality. One obvious difference is the open-/closed-source aspect of the projects.
Any interest out there in an open-source CMS from Microsoft?
Saturday, December 6, 2008
8 simple SEO tips for blogs
Follow these simple rules for search engine optimization and your blog will rank much higher in Search Engines.
- Use your primary keyword in your blog domain
The first thing to do is to ensure that your blogs URL contains the primary keyword you want to optimize for. Using the targeted keyword in subdomains also helps.
For example, if you want to start a HTML tutorial site then the primary keyword you want your URL to contain is html. So choose a URL like www.htmlhelp.com.
You can also use the keyword in subdomains like www.web-design.com/htmlhelp
- Use your primary keyphrase in the title of your posts
If your primary key phrase is html help make sure that the word html and help appear in your blog headers such as H1 and H2 tags as well as the title of each of your posts.
- Use your secondary keywords in the body of your post
If you want to get listed for secondary keywords use them infrequently in the body of your post. The theory is that the more times a keyword appears within a Webpage, the more relevant the page is likely to be for someone searching those keywords.
But do not overdo this by repeating the same keywords over and over again. Google bots can find out if a keyword is too frequent on a page and might just remove your site from their index.
- Use your keywords in the anchor text of links
Use your primary and secondary keywords in the anchor text of links when linking to other blog posts or to other pages of your blog. Keyword in links have more importance than simple text.
- Make sure search engines can spider your blog easily
Make sure your navigation bar is present on all pages of your blog. Your previous posts or atleast the popular ones should be linked to all pages so they get spidered easily.
- Get backlinks from other blogs
You need as many links as possible to link back to your posts or blog because it will help you build pagerank and get your blog to rank higher in search engines. The more links you have the higher your blog is ranked in Technorati helping your blog to be found easily.
So how do you get backlinks?
- The first thing to do to get high-quality links is to submit your blog and RSS feed to blog search engines and directories.
Start by submitting your blog to all the directories listed on this page:
http://www.masternewmedia.org/rss/top55/ - Link exchanging with other similarly-themed blogs will help you to form richly interlinked networks or communities.
- If you find an interesting article on another blog, link to it generously. The trackback will become a link back to your blog.
- Lastly posting legitimate comments in response to posts on other blogs will help you get backlinks. Regularly post legitimate comments in similarly-themed blogs with high traffic to get many backlinks.
- The first thing to do to get high-quality links is to submit your blog and RSS feed to blog search engines and directories.
- Update your blog frequently
Update your blog frequently using all the rules mentioned above and your blog will surely get top rankings in a short time.
- Stick with your blog
Once you start posting on your blog, stick with the same domain or you could end up losing a lot of your traffic and regular readers.
Also stick with the topic you selected for your blog. If it’s about pets don’t suddenly switch to another topic such as Gadget’s because you will loose traffic.
For tips on building traffic to your blog, read the series- How to increase your blogs traffic
Silverlight : Using ViewportOrigin and ViewportWidth in Deep Zoom
I’m posting this because the documentation on ViewportOrigin is wrong and it might be a while before it can be updated on the live site. In the meantime, this post discusses how to use ViewportOrigin and ViewportWidth to control the viewport. Controlling the viewport allows you to specify the magnification level and location on a MultiScaleImage to zoom in on.
Let’s start with ViewportWidth. This value sets how wide the viewport window is relative to the entire image.
- ViewportWidth = 1: Displays the entire image (default).
- ViewportWidth <>: Zooms in on the image. You zoom in deeper into the image the closer you get to zero where zero is “completely zoomed in” and the user cannot see the image at all. The fraction of the width of the image that is visible is the ViewportWidth.
- ViewportWidth > 1: Zooms out from the image. The number of times the viewport is larger than the image is the ViewportWidth.
Note: See diagram below for examples.
Ok, so the width of the Viewport specifies how much in or out to zoom on the image but it does not specify where on the image the Viewport is viewing. To specify this, use the ViewportOrigin. The top left corner of the viewed image (not the MultiScaleImage, the container panel or canvas in which this image renders) is always (0,0).


For ViewportOrigin, the value specifies where the corner of the viewport should be relative to the corner of the image. This means if you want some blank space between the edge of the image and the viewport, you need to move the viewport to a negative location off the image. If you want the viewport to show just a portion of the image, then it will get moved to a positive location within the full image.
Note that in the diagrams above, I’m using coordinate numbers that conveniently place the image or area of the image within a neat square of the conceptual grid. This is only for demonstration purposes since you can specify any numbers (see diagram below); however, numbers outside the appropriate range (too high or too low) for either ViewportOrigin or ViewportWidth will render nothing of the image.

Note: Special thanks to Dan Cory and Lutz Gerhard (Microsoft Program Managers) for their review and feedback regarding this info.
Thanks,
Kaushik
Silverlight : Where did my ComboBox selected item go?
You might have noticed that sometimes the item in the selection box of a combo box disappears when you reopen the drop-down of the combo.
For example, in the following image, "Arial" is selected,
![]()
but doesn't show up in the selection box when the drop-down is reopened.

In contrast, in the following ComboBox, the selected item, "Courier New", is visible in the selection box when the drop-down is reopened.

Here's the code for the first combo box:
The reason the selected item disappears is because a UIElement cannot be in the visual tree more than once. In the first case, I've explicitly created ComboBoxItems and set their content to font names. ComboBoxItem is a UIElement and when it is in the drop-down, it can't be shown in the selection box. When the drop down is closed the UIElement is temporarily moved in the visual tree to be shown as the selected item. This occurs for all UIElements in a Silverlight combo box.
CLR objects that are not derived from UIElement do not have this limitation. In the second case the items are added to the combo box through a binding. The combo box is bound to a collection of strings:
ItemsSource="{Binding}" />
ObservableCollection
new ObservableCollection
fonts.Add("Arial");
fonts.Add("Courier New");
fonts.Add("Times New Roman");
FontsCombo.DataContext = fonts;
When CLR objects are used to populate a combo box, UIElements are automatically generated for them using the data template (in this case the default data template is a TextBlock). Two different UIElements are created so CLR objects can be shown in both the selection box and drop-down at the same time.
Hopefully this clears up any confusion. Also this info is now in the online docs.
Kaushik
Friday, December 5, 2008
Tips for using the RadGrid
Brian Mains continues his overview of the Telerik’s RadGrid Component.
Introduction
Previously, I wrote about using the RadGrid control and how to setup the UI for a simple GridView-like look. In this article, I’m going to talk about some of the tips and tricks that you can give the RadGrid to become more responsive.
Row Clicking
When supporting the ability to select a record in the GridView, the grid needs to have a button that triggers the selection of the row. This causes a postback and sets the selected index of the row, raises an event, and performs some other features. The RadGrid provides this capability using a button as well, but goes a step further. By specifying that the grid can post back on a row click, the row can be selected simply by selecting the row.
Listing 1: Enabling postback on a row click
- <tel:RadGrid ID="rgCourses" runat="server" Skin="Web20"
- AllowFilteringByColumn="true" onneeddatasource="rgCourses_NeedDataSource"
- AllowSorting="true">
- <ClientSettings EnablePostBackOnRowClick="true" />
- tel:RadGrid>
The ClientSettings property defines a host of client-side features that can be added to the Grid. One of these is the ability to postback upon clicking a row. If setting up that the RadGrid posts back asynchronously (using the RadAjaxManager as previously discussed), the RadGrid’s postback won’t be apparent to the user.
But a postback does occur when the row is clicked, and this fires the RowCommand event called RowClick. For instance, I could use the following code to show an alert, as shown in Listing 2.
Listing 2: Handling a row click
- protected void rgCourses_ItemCommand(object source, GridCommandEventArgs e)
- {
- if (e.CommandName == "RowClick")
- {
- RadAjaxManager manager = RadAjaxManager.GetCurrent(this.Page);
- manager.Alert("Row was clicked!");
- }
- }
An alert appears to the user to let them know the row was clicked.
Displaying an Empty Message
When displaying an empty message (when no records exist in the underlying data source), it’s nice to have a message appear and let the users know it. This is where the NoRecordsTemplate comes into play:
Listing 3: No Data Template
- <MasterTableView AutoGenerateColumns="false" ..>
- <NoRecordsTemplate>There isn't any data.NoRecordsTemplate>
- MasterTableView>
But to get this template to appear, it requires a few settings. First, the EnableNoRecordsTemplate sets whether theNoRecordsTemplate appears in the first place. If true, if a non-null collection with no records is returned, the template appears. Note what I said; passing null as the data source does not make the no-records template appear.
Sometimes it’s helpful to have the header of the control appear when the no record template appears in the grid. The GridView doesn’t do this at all; it renders a single cell with the empty message only. The RadGrid gives you some options.
Listing 4: The final code for binding no data
- <tel:RadGrid ID="rgCourses" runat="server" Skin="Web20"
- AllowFilteringByColumn="true" onneeddatasource="rgCourses_NeedDataSource"
- AllowSorting="true">
- <MasterTableView AutoGenerateColumns="false" EnableNoRecordsTemplate="true"
- ShowHeadersWhenNoRecords="false">
- <NoRecordsTemplate>There isn't any data.NoRecordsTemplate>
- MasterTableView>
- <ClientSettings />
- tel:RadGrid>
- this.rgCourses.DataSource = new object[] {};
- this.rgCourses.DataBind();
This produces the following result when no data is entered.
Figure 1: Empty Data Message

Editing Data
Editing data works similarly to the GridView, with a noticeable difference. There are different ways to edit the data. For instance, instead of changing the row to edit in the current row, the Telerik RadGrid control edits data using a form beneath the row. This is due to the EditForms setting for the EditMode property of the MasterTableViewproperty. Take a look at the example below:
Figure 2: Editing in a separate form

This can be changed however; editing can occur in place by changing the EditMode property to InPlace.
Listing 5: Setting the EditMode
- <MasterTableView … EditMode="InPlace">
Changing to in-place editing uses a more familiar GridView-like result shown below.
Figure 3: In-Place editing

A third option is to use the PopUp option; this option pops up a new window that the user can use to edit the information outside of the context of the grid altogether.
To generate the edit button you see above (edit turns to update and cancel just like the GridView does whenever editing is invoked), there are two ways to do this. Turning on AutoGenerateEditColumn at the RadGrid level generates an edit column, as well as using the GridEditCommandColumn class. I opted for the latter approach, as shown in Figure 6.
Listing 6: Generating an update column
- <tel:GridEditCommandColumn EditText="Update" UniqueName="Update" />
Accessing Rows and Cells
The RadGrid uses the same underlying table structure that the GridView uses, which is the logical choice considering the layout of the user interface. Each row is of the type GridItem; however, its actual underlying representation is GridDataItem or GridEditableItem. This is because the GridItem class is the base class for each of these classes; the GridDataItem represents a read-only data bound item view, whereas the GridEditableItem represents an item currently being edited.
When accessing data (like in ItemDataBound), the event argument’s Item property (represented by the GridItem class) can be cast to one of these two types. This allows accessing of the cell using the unique name, which isn’t defined in the base class (the base class does have a collection of cells though).
For instance, the style of the abstract column could be changed by using the unique name to get the target cell, then change the italicized setting to true as shown in listing 7.
Listing 7: Setting the abstract column’s font to italic
- if (e.Item is GridDataItem)
- {
- ((GridDataItem)e.Item)["Abstract"].Font.Italic = true;
- }
The GridDataItem changes the abstract to italic for each and every row like you would do in the RowDataBound for the GridView; it’s the same concept here. The nice thing about this approach is that the developer isn’t forced to hard-code a positional index to get the cell; they can reference by a unique name.
The row also has some other useful properties/methods. If wanting to figure out if the row is in edit mode (outside of the underlying row type), you can also check out the GridItem’s IsInEditMode property, which is true for a row currently in edit mode. The GridItem class also has an ItemIndex and ItemType properties for determining position and type of row. Interestingly enough, the GridItem also has a RowIndex that determines the index of the row (which could be different than ItemIndex because of the Grid’s header row in the underlying table).
Auto Generated Columns
Both the GridView and the RadGrid have the ability to auto-generate the columns of the grid using the structure from the underlying data source. The RadGrid control maintains a collection of columns for each of the auto-generated columns, using the AutoGeneratedColumns collection in the GridTableView object.
This collection can be important if you want to access column information in the code-behind. Remember above, using the GridDataItem class, I accessed a column called “Abstract”, which used the unique name. The unique name wouldn’t necessarily be known in an auto generation approach. An alternative approach using this collection could be:
Listing 8: Finding an auto-generated column
- protected void rgCourses_ItemDataBound(object sender, GridItemEventArgs e)
- {
- if (e.Item is GridDataItem)
- {
- GridDataItem dataItem = (GridDataItem)e.Item;
- var column = this.rgCourses.MasterTableView.AutoGeneratedColumns.First(i => i.HeaderText == "Abstract");
- dataItem[column].Font.Italic = true;
- }
- }
Using LINQ, the master table view’s generated columns is queried for a column name with the header “Abstract”, the name of the column. In this case, the unique name probably matches the header text, but in case it doesn’t, the method finds a matching header and uses the column to set the italics for.
Conclusion
In this article, we learned a few tricks for working with the RadGrid control, and how to adjust it to add functionality for certain tasks, and how to support working with its object model on the server-side.
Saturday, November 22, 2008
Google adds to search
Google has begun rolling out 3 new additions to its search engine on November 20th. The search engine giant added a Promote, Remove and Comment buttons beside each search to help users define their results better.

The Promote feature will allow you to move results up to the top of the list of your results, for future searches. This little addition to the search engine will help users by adding their favourite web sites to the top of each individual search result, that brings back that page. So for instance, if a user wished to promote www.neowin.net to the top of the page, and query a search for a keyword on the front page, it would place Neowin.net on the top of your search results. This is a benefit for people who promote their favourite sites like Neowin to return the first result.
Beside the Promote button, comes the Remove button. This button will delete that result from your future searches, to prevent it from coming back up again. This could be helpful in blocking those web sites that provide no helpful information to you. This is a great way to stop going back to the same bad result time and time again.
Finally, the Comment button, where users can leave a comment about any result, making it useful for coming back to later. Users can add helpful comments for other users, or for themselves when visiting the site next time.
Google has become one step closer to being your next bookmark organizer. Now you can view, save and edit your favourite sites all within Google. The bad thing about these features is, the fact most people don't search the same thing all the time, making it hard to take advantage of some of these features.
Wednesday, November 5, 2008
More model-driven development in .NET Framework "4", Visual Studio "10"
Microsoft gave hints about coming releases of the .NET Framework "4" (4.0?) and Visual Studio "10" (2010?) at the Microsoft SOA & Business Process Conference. They’ll be part of a multiyear effort called "Oslo" that aims to make composite applications more mainstream.
The most interesting parts of the press release were the first mentions (that I have seen) of the future versions of the .NET Framework and Visual Studio:
Building on the technology available today, the “Oslo” advancements will be delivered through Microsoft server and tools products in five key areas:
•Server. Microsoft BizTalk Server “6” will continue to provide a core foundation for distributed and highly scalable SOA and BPM solutions, and deliver the capability to develop, manage and deploy composite applications.
•Services. BizTalk Services “1” will offer a commercially supported release of Web-based services enabling hosted composite applications that cross organizational boundaries. This release will include advanced messaging, identity and workflow capabilities.
•Framework. The Microsoft .NET Framework “4” release will further enable model-driven development with Windows Communication Foundation (WCF) and Windows Workflow Foundation (WF).
•Tools. New technology planned for Visual Studio “10” will make significant strides in end-to-end application life-cycle management through new tools for model-driven design of distributed applications.
•Repository. There will also be investments in aligning the metadata repositories across the Server and Tools product sets. Microsoft System Center “5,” Visual Studio “10” and BizTalk Server “6” will utilize a repository technology for managing, versioning and deploying models.
Not every programmer is thrilled in model-driven development, but I think it has it’s place in certain types of projects where reusability is easier to achieve.
Microsoft Unveils Next Version of Visual Studio and .NET Framework
Microsoft Corp. today provided the first look at the next version of its developer tools and platform, which will be named Visual Studio 2010 and the .NET Framework 4.0. Microsoft described the next release through the following five focus areas: riding the next-generation platform wave, inspiring developer delight, powering breakthrough departmental applications, enabling emerging trends such as cloud computing, and democratizing application life-cycle management (ALM).
Today’s announcement included an in-depth look at how Visual Studio Team System (VSTS) 2010 (code-named “Rosario”) will help democratize ALM with a unique solution that brings all the members of a development organization into the application development life cycle, and removes many of the existing barriers to integration. Additional details on the other focus areas will be disclosed over the product development cycle.
“With Visual Studio 2010 and the .NET Framework 4.0, we are focused on the core pillars of developer experience, support for the latest platforms spanning client, server, services and devices, targeted experiences for specific application types, and core architecture improvements,” said S. “Soma” Somasegar, senior vice president of the Developer Division at Microsoft. “These pillars are designed specifically to meet the needs of developers, the teams that drive the application life cycle from idea to delivery, and the customers that demand the highest quality applications across multiple platforms. You can expect to hear a lot more about Visual Studio 2010 and the .NET Framework 4.0 in the coming months.”
Democratizing Application Life-Cycle Management
Today, much of application development remains siloed throughout the enterprise, leading to decreased productivity and lengthy product development cycles. With VSTS 2010, Microsoft is taking the next step forward in giving individuals and development organizations an advanced solution that enables them to integrate effectively and build and deliver high-quality applications.
This includes new capabilities that make it easier for all contributors on the software team to participate throughout the life cycle — from the core developers and testers to the wider team of project managers, designers and business analysts. Highlights include the following:
• Modeling tools.
With VSTS 2010 Architecture, Microsoft will enable both technical and nontechnical users to create and use models to collaborate and to define business and system functionality graphically. The new version supports both Unified Modeling Language and Domain Specific Language support, so development organizations will have the right tool for right job. The new modeling capabilities in VSTS 2010 are a core part of the larger Microsoft modeling platform, which will also include the “Oslo” repository, tools and language.
• Improved efficiency throughout the test cycle.
With VSTS 2010, Microsoft has made a significant investment in testing features and dramatically simplifying the tools required to integrate testing across the life cycle. New features include the ability to eliminate nonreproducible bugs, fast setup and deployment of tests to ensure the highest degree of completeness of test, focused test planning and progress tracking, and ensuring that all code changes are properly tested.
• Substantial improvements in collaboration capabilities.
Microsoft has made major investments in the capabilities and scalability of Team Foundation Server (TFS) including significant improvements that allow teams to configure and adopt any flavor of Agile development processes. Teams can track and trace work more easily with richer linking of work items enabling hierarchical work item relationships. In the source code management system, TFS now provides visualization tools for tracking changes across branches and into the production build. VSTS 2010 also introduces workflow-based builds that catch errors before they have a chance to affect the rest of the team or, worse, enter production. Finally, administrators will find dramatically simpler TFS deployment and management.
“The application life cycle is an integral part of today’s business. Regardless of core competencies, all organizations are driven by software that is created and customized to deliver a competitive advantage,” said Theresa Lanowitz, founder of voke, inc. “Enterprises that invest in an ALM solution can decrease their total cost of ownership of applications in their IT portfolio, and bring about a global approach that is an integrated and expansive system consisting of people, processes and technology. This global approach to ALM facilitates collaboration and takes the risk out of software development to produce predictable and reliable results for an optimized business outcome. Solutions such as VSTS are poised to take advantage of market opportunity by offering an application life-cycle platform to help enterprises realize this ROI benefit.”
In another move to increase integration across the life cycle, Microsoft also announced that VSTS 2010 will provide a unified VSTS Development and Database product. As a benefit to existing Software Assurance (SA) customers, those who currently own Visual Studio Team System 2008 Development Edition or Visual Studio Team System 2008 Database Edition will receive all the following products starting Oct. 1, 2008, for free:
• Visual Studio Team System 2008 Development Edition
• Visual Studio Team System 2008 Database Edition
• Visual Studio 2005 Team System for Software Developers
• Visual Studio 2005 Team System for Database Professionals
The products will be available to SA customers through their normal Microsoft Developer Network channel. More information can be found at http://www.microsoft.com/licensing/sa.
More information about Visual Studio 2010 and the .NET Framework 4.0 is available at http://go.microsoft.com/?linkid=9537302.
Founded in 1975, Microsoft (Nasdaq “MSFT”) is the worldwide leader in software, services and solutions that help people and businesses realize their full potential.
Note to editors:If you are interested in viewing additional information on Microsoft, please visit the Microsoft Web page at http://www.microsoft.com/presspass on Microsoft’s corporate information pages. Web links, telephone numbers and titles were correct at time of publication, but may since have changed. For additional assistance, journalists and analysts may contact Microsoft’s Rapid Response Team or other appropriate contacts listed at http://www.microsoft.com/presspass/contactpr.mspx.
Thursday, September 25, 2008
ASP.NET tab in IIS, more dangerous than it first appears!
I stumbled across a very interesting find yesterday morning and Todd Carter confirmed it by sending a link to his blog entry. (it's a good read)
First let me cover briefly what an AppDomain is. ASP.NET (.NET Winforms too but I won't cover that here) starts and runs within a sandbox called an AppDomain. Each Application on a server will run its own AppDomain which allows separation between different parts of the site for better security isolation and availability. If a folder is marked as an application, it will live within a different AppDomain than the root of the site. This information is not easily seen in IIS6 and earlier versions of IIS, but AppDomains are there just the same.
What this means though is that if the AppDomain is restarted, then there is a performance hit while the AppDomain is started up and pages are recompiled on their first hit. Furthermore, session state that is running In-Process is lost. In-Process, or "InProc" session state is the default setting.
In ASP.NET v1.x, there is an AppDomain restart when global.asax, web.config or anything related to the /bin folder is 'touched'. By 'touched', I mean renaming, creating, or updating the file in any way. And of course an IIS6 application pool recycle or a restart of IIS would cause the old AppDomain to shut down and a new one to start. This all made sense because those were application files and any change to them would make significant changes to the running AppDomain.
While troubleshooting an unrelated issue on a v2.0 site yesterday, I noticed that there was an AppDomain restart simply by creating a non-application folder. Through further testing I found that adding folders, deleting folders and renaming folders caused the AppDomain recycle. Furthermore, if many dozen files were added in short succession to each other, that would also case the same restart. Of course the app_{folders} will cause a restart, and that makes sense, but completely non-application related folders also cause this same behavior.
It turns out that this was a purposeful change with v2.0 and was done so that stale content doesn't remain in place after a significant change. I guess there were enough situations where that happened that they changed the situations that caused an AppDomain recycle to be far more aggressive than v1.x of the framework.
What does this mean? Unfortunately quite a bit. People that used to make quick updates to their websites thinking that it wouldn't affect performance of unrelated parts of the site now need to consider that any changes to folders will cause the entire AppDomain to be restarted. Also a large number of changes to files within the site will do the same. (I'm not sure at this time the threshold that triggers a restart based on file changes). This will immediately kill all InProc session state and cause a performance hit on the site.
I'm normally not one to complain about .NET, there are so many great things to say about it. But in this situation, I think this is a step backward. At this time, there is no way to disable this aggressive response to file and folder changes. The linkd.exe solution that Todd gave in the blog entry is a solution, but it's not an easy one and isn't reasonable in many situations.
I don't have a good solution for this, but at least I am now aware of the affects of various file and folders changes and can watch out for that when making site updates or troubleshooting sites.
Sunday, August 17, 2008
ASP.NET MVC Framework Controller Action Security
Introduction:
ASP.NET MVC Framework allows the developers to build their web application in a more flexible way. Using MVC framework you by passes the headaches of ViewState and Postbacks and also enable your application for testing. In this article we are going to take a look at the Controller Action Role-Based Security.
Prerequisite:
If this is your first encounter with ASP.NET MVC Framework then I strongly suggest that you check out the introductory article using the link below:
Getting Started with the ASP.NET MVC Framework
Scenario:
The scenario is really simple. A list of categories is displayed on the page and when the user clicks on the category it will be deleted. But we need to make sure that the user is authorized to delete the items.
Populating the Page with List of Categories:
The first task is to populate the page with a list of categories. Let’s see how this can be implemented.
[ControllerAction]
public void List()
{
NorthwindDataContext northwind = new NorthwindDataContext();
var list = northwind.Categories;
RenderView("Categories", list);
}
The List action is responsible for populating the Categories view with the required data. Let’s check out the Categories view.
public partial class Categories : ViewPage
{
}
<% foreach (var category in ViewData) { %>
<%= Html.ActionLink
category.CategoryName, new { onclick = "return confirmDelete(" + category.id + ")" })%>
<%} %>
The first thing to note is the Categories class inherits from the ViewPage which is of IEnumerable
The foreach loop is used to iterate through the categories. The Html.ActionLink method is used to create hyperlinks which are directed to particular controllers. The first argument to the Html.ActionLink is the Linq expression for the action. The argument c => c.Delete(category.id) means that we are attaching the Delete action to all the categories in the ViewData object. The Delete operation will take a single parameter which is categoryId. The next parameter is the text to appear for the hyperlink. The final parameter is the HTML attributes. We are using onclick attribute of the hyperlink which will popup a confirmation box.
The HTML generated for the page might look something like this:
<a href="/Category/Delete/1" onclick="return confirmDelete(1)" >Beverages Edite</a>
<br />
<a href="/Category/Delete/2" onclick="return confirmDelete(2)" >Condiments</a>
<br />
<a href="/Category/Delete/3" onclick="return confirmDelete(3)" >Confections</a>
<br />
<a href="/Category/Delete/4" onclick="return confirmDelete(4)" >Dairy Products</a>
<br />
Now, looking at the URL’s above anyone can easily delete the item by simply copying the URL in the address bar. So, the question is how do we secure the controller actions so only authorized users would be able to delete the items.
Controller Action Security:
ASP.NET MVC Framework is still in its development phases and there is still a lot on the wish list. Maybe in few months the framework will provide us the flexibility to configure action based security easily.
For now let’s use another approach to add security to our controller actions. The OnPreAction event is fired before the action is executed and this seems to be an ideal place to authorize the user. You can override the OnPreAction of the controller class but this solution is not scalable since then you will need to override all the controllers for security purposes. A better approach is to introduce a BaseController and override the OnPreAction of the BaseController. All the controllers will derive from the BaseController class instead of the Controller class. And the BaseController will derive from the Controller class.
protected override bool OnPreAction(string actionName, System.Reflection.MethodInfo methodInfo)
{
string controllerName = methodInfo.DeclaringType.Name;
if(!IsAuthorized(controllerName,actionName)) throw new SecurityException("not authenticated");
return base.OnPreAction(actionName, methodInfo);
}
The IsAuthorized custom method is responsible for performing the actual authorization.
private bool IsAuthorized (string controllerName, string actionName)
{
System.Web.HttpContext context = System.Web.HttpContext.Current;
XDocument xDoc = null;
if (context.Cache["ControllerActionsSecurity"] == null)
{
xDoc = XDocument.Load(context.Server.MapPath("~/ControllerActionsSecurity.xml"));
context.Cache.Insert("ControllerActionsSecurity",xDoc);
}
xDoc = (XDocument) context.Cache["ControllerActionsSecurity"];
IEnumerable
var role = (from e in elements
where ((string)e.Attribute("controllerName")) == controllerName
&& ((string)e.Attribute("actionName")) == actionName
select new { RoleName = e.Attribute("Roles").Value }).SingleOrDefault();
if (role == null) return true;
if (!User.IsInRole(role.RoleName))
return false;
return true;
}
Nothing too complicated! The authorization details are stored in an XML file called ControllerActionsSecurity.xml. Here are the contents of the file:
controllerName: The name of the controller
actionName: The action of the controller
Roles: Authorized roles
If you need to add authorization to a different controller then simply make an entry in the XML file with the appropriate controllerName and the actionName.
Conclusion:
In this article we learned how to authorize the user based on the controller and the action. Hopefully, ASP.NET team will introduce more flexible ways to authorize the users based on their actions.
I hope you liked the article happy coding!
Monday, August 11, 2008
Tip/Trick: Optimizing ASP.NET 2.0 Web Project Build Performance with VS 2005
This posts covers how to best optimize the build performance with Visual Studio 2005 when using web projects. If you are experiencing slow builds or want to learn how to speed them up please read on.
Quick Background on VS 2005 Web Site Project and VS 2005 Web Application Project options
 VS 2005 supports two project-model options: VS 2005 Web Site Projects and VS 2005 Web Application Projects.
VS 2005 Web Site Projects were built-in with the initial VS 2005 release, and provide a project-less based model for doing web development that uses that same dynamic compilation system that ASP.NET 2.0 uses at runtime. VS 2005 Web Application Projects were released as a fully supported download earlier this spring, and provide a project model that uses a MSBuild based build system that compiles all code in a project into a single assembly (similar to VS 2003 -- but without many of the limitations that VS 2003 web projects had with regard to FrontPage Server Extensions, IIS dependencies, and other issues). To learn more about VS 2005 Web Application Projects, please review the tutorials I've published on my http://webproject.scottgu.com web-site. Note that VS 2005 Web Application Project support will be included in VS 2005 SP1 (so no additional download will be required going forward).
Both the VS 2005 Web Site Project option and the VS 2005 Web Application Project option will continue to be fully supported going forward with future Visual Studio releases. What we've found is that some people love one option, while disliking the other, and vice-versa. From a feature perspective there is no "one best option" to use - it really depends on your personal preferences and team dynamics as to which will work best for you. For example: a lot of enterprise developers love the VS 2005 Web Application option because it provides a lot more build control and team integration support, while a lot of web developers love the VS 2005 Web Site model because of its "just hit save" dynamic model and flexibility.
Two articles you might find useful to decide which works best for you is this MSDN whitepaper that includes some comparisons between the two models, and Rick Strahl's Web Application Projects and Web Deployment Projects are Here article that provides a good discussion of the pros/cons of the different options.
To migrate from the VS 2005 Web Site Project model to the VS 2005 Web Application Project model, please follow this C# or VB tutorial that walks-through the steps for how to-do so.
So Which Project Option Builds Faster?
When doing full builds of projects, the VS 2005 Web Application Project option will compile projects much faster that the VS 2005 Web Site Project option. By "full build" I mean cases where every class and page in a project is being compiled and re-built - either because you selected a "Rebuild" option within your "build" menu, or because you modified code within a dependent class library project or in the /app_code directory and then hit "build" or "ctrl-shift-b" to compile the solution.
There are a few reasons why the VS 2005 Web Application Project ends up being significantly faster than Web Site Projects in these "full rebuild" scenarios. The main reason is that (like VS 2003), the VS 2005 Web Application Project option only compiles your page's code-behind code and other classes within your project. It does not analyze or compile the content/controls/in-line code within your .aspx pages -- which means it does not need to parse those files. On the downside this means that during compilation it will not check for errors in those files (unlike the VS 2005 Web Site Project option which will identify any errors there). On the positive side it makes compilations much faster.
So does this mean that you should always use the VS 2005 Web Application Project option to get the fastest build times with large projects? No -- not necessarily. One nice feature that you can enable with the VS 2005 Web Site Project option is support for doing "on demand compilation". This avoids you having to always re-build an entire project when dependent changes are made -- instead you can just re-build those pages you are working on and do it on-demand. This will lead to significant build performance improvements for your solution, and can give you a very nice workflow when working on very large projects. I would definitely recommend using this option if you want to improve your build performance, while retaining the flexibility of the web-site model.
The below sections provide specific tutorials for both the VS 2005 Web Site Project Model and the VS 2005 Web Application Project Model on optimization techniques -- including the "on demand compilation" build option I described above.
Specific Tips/Tricks for Optimizing VS 2005 Web Site Project Build Times
When using the VS 2005 Web Site Project model, you can significantly improve build performance times by following these steps:
1) Verify that you are not suffering from an issue I call "Dueling Assembly References". I describe how to both detect and fix this condition in this blog post. If you are ever doing a build and see the compilation appear to pause in the "Validating Web Site" phase of compilation (meaning no output occurs in the output window for more than a few seconds), then it is likely that you are running into this problem. Use the techniques outlined in this blog post to fix it.
2) Keep the number of files in your /app_code directory small. If you end up having a lot of class files within this directory, I'd recommend you instead add a separate class library project to your VS solution and move these classes within that instead since class library projects compile faster than compiling classes in the /app_code directory. This isn't usually an issue if you just have a small number of files in /app_code, but if you have lots of directories or dozens of files you will be able to get speed improvements by moving these files into a separate class library project and then reference that project from your web-site instead. One other thing to be aware of is that whenever you switch from source to design-view within the VS HTML designer, the designer causes the /app_code directory to be compiled before the designer surface loads. The reason for this is so that you can host controls defined within /app_code in the designer. If you don't have an /app_code directory, or only have a few files defined within it, the page designer will be able to load much quicker (since it doesn't need to perform a big compilation first).
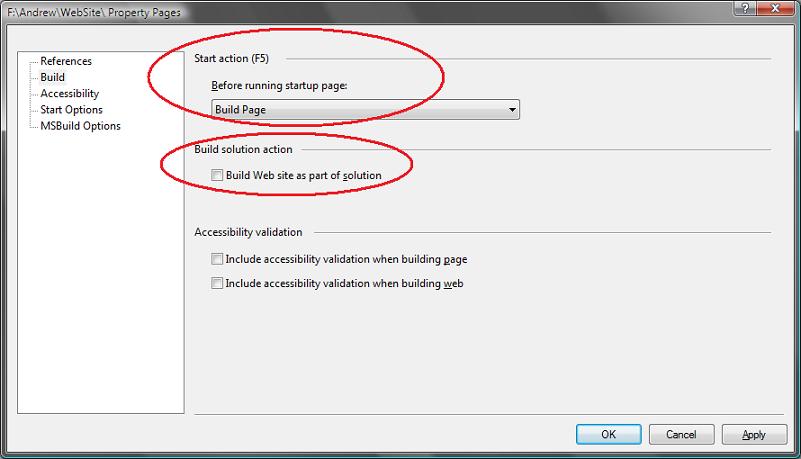
3) Enable the on-demand compilation option for your web-site projects. To enable this, right-click on your web-site project and pull up the project properties page. Click the "Build" tab on the left to pull up its build settings. Within the "Build" tab settings page change the F5 Start Action from "Build Web Site" to either the "Build Page" or "No Build" option. Then make sure to uncheck the "Build Web site as part of solution" checkbox:
When you click ok to accept these changes you will be running in an on-demand compilation mode. What this means (when you select the "Build Page" option in the dialog above) is that when you edit a page and then hit F5 (run with debugging) or Ctrl-F5 (run without debugging) the solution will compile all of the class library projects like before, then compile the /app_code directory and Global.asax file, and then instead of re-verifying all pages within the web-site it will only verify the current page you are working on, and any user controls that the page references. With large (and even medium) projects with lots of pages, this can obviously lead to major performance wins. Note that ASP.NET will automatically re-compile any other page or control you access at runtime -- so you will always have an up-to-date and current running application (you don't need to worry about old code running). You can optionally also use the "No Build" option to by-pass page-level validation in the IDE, which obviously speeds up the entire process much further (I'd recommend giving both options a try to see which you prefer).
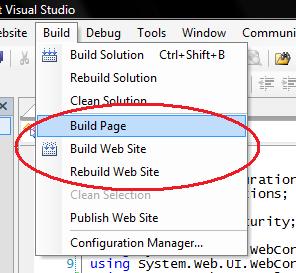
By deselecting the "Build Web site as part of solution" checkbox, you will find that the Ctrl-Shift-B keystroke (which builds the solution) will continue compiling all class library projects, but will not re-build all pages within your web-site project. You will still get full intellisense support in your pages in this scenario - so you won't lose any design-time support. You will also continue to get warning/error squiggles in code/class when they are open. If you want a way to force a re-build to occur on pages not open, or across all pages within the web-site, you can use the "Build Page" or "Build Web Site" menu options within the "Build" menu of Visual Studio:
This gives you control as to which pages on your site you want to verify (and when) - and can significantly improve build performance. One trick I recommend doing is adding a new shortcut keystroke to your environment to allow you to quickly short-cut the "Build Page" menu option to avoid you having to ever use a mouse/menu for this. You can do this by selecting the Tools->Customize menu item, and then click the "Keyboards" button on the bottom-left of the customize dialog. This will bring up a dialog box that allows you to select the VS Build.BuildPage command and associate it within any keystroke you want:
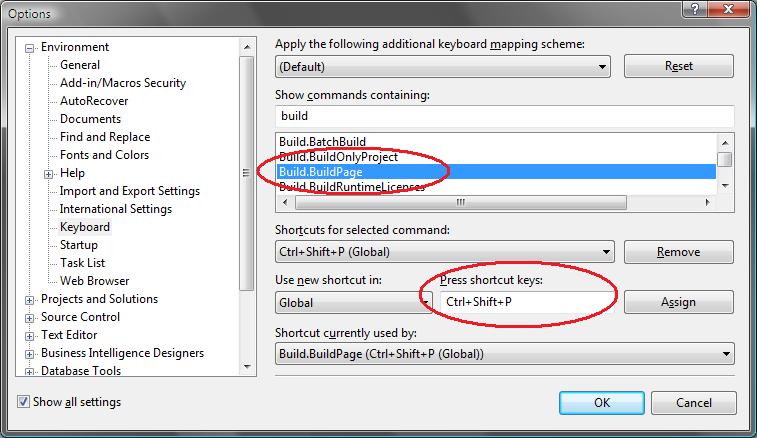
Once you do this, you can type "Ctrl-Shift-P" (or any other keystroke you set) on any page to cause VS to compile any modified class library project (effectively the same thing that Ctrl-Shift-B does), then verify all classes within the /app_code directory, and then re-build just the page or user control (and any referenced master pages or user controls it uses) that you are working on within the project.
Once the above steps are applied, you should find that your build performance and flexibility is much improved - and that you have complete control over builds happen.
Specific Tips/Tricks for Optimizing VS 2005 Web Application Project Build Times
If you are using the VS 2005 Web Application project option, here are a few optimizations you might want to consider:
1) If you have a very large project, or are working on an application with many other developers, you might want to consider splitting it up into multiple "sub-web" projects. I wouldn't necessarily recommend this for performance reasons (unless you have thousands and thousands of pages it probably doesn't make a huge difference), but it can sometimes make it easier to help manage a large project. Please read this past blog-post of mine on creating sub-web projects to learn how to use this.
2) Consider adding a VS 2005 Web Deployment project to your solution for deep verification. I mentioned above that one downside of using the VS 2005 Web Application Project option was that it only compiled the code-behind source code of your pages, and didn't do a deeper verification of the actual .aspx markup (so it will miss cases where you have a mis-typed tag in your .aspx markup). This provides the same level of verification support that VS 2003 provided (so you aren't loosing anything from that), but not as deep as the Web Site Project option. One way you can still get this level of verification with VS 2005 Web Application Projects is to optionally add a VS 2005 Web Deployment Project into your solution (web deployment projects work with both web-site and web-application solutions). You can configure this to run only when building "release" or "staging" builds of your solution (to avoid taking a build hit at development time), and use it to provide a deep verification of both your content and source code prior to shipping your app.
Common Tips/Tricks for Optimizing any VS 2005 Build Time
Here are a few things I recommend checking anytime you have poor performance when building projects/solutions (note: this list will continue to grow as I hear new ones - so check back in the future):
1) Watch out for Virus Checkers, Spy-Bots, and Search/Indexing Tools
VS hits the file-system a lot, and obviously needs to reparse any file within a project that has changed the next time it compiles. One issue I've seen reported several times are cases where virus scanners, spy-bot detecters, and/or desktop search indexing tools end up monitoring a directory containing a project a little too closely, and continually change the timestamps of these files (they don't alter the contents of the file - but they do change a last touched timestamp that VS also uses). This then causes a pattern of: you make a change, rebuild, and then in the background the virus/search tool goes in and re-searches/re-checks the file and marks it as altered - which then causes VS to have to re-build it again. Check for this if you are seeing build performance issues, and consider disabling the directories you are working on from being scanned by other programs. I've also seen reports of certain Spybot utilities causing extreme slowness with VS debugging - so you might want to verify that you aren't having issues with those either.
2) Turn off AutoToolboxPopulate in the Windows Forms Designer Options
There is an option in VS 2005 that will cause VS to automatically populate the toolbox with any controls you compile as part of your solution. This is a useful feature when developing controls since it updates them when you build, but I've seen a few reports from people who find that it can cause VS to end up taking a long time (almost like a hang) in some circumstances. Note that this applies both to Windows Forms and Web Projects. To disable this option, select the Tools->Options menu item, and then unselect the Windows Forms Designer/General/AutoToolboxPopulate checkbox option (for a thread on this see: http://forums.asp.net/1108115/ShowPost.aspx).
3) Examine which 3rd party packages are running in Visual Studio
There are a lot of great 3rd party VS packages that you can plug into Visual Studio. These deliver big productivity wins, and offer tons of features. Occasionally I've seen issues where performance or stability is being affected by them though. This is often true in cases where an older version (or beta) of one of these packages is being used (always keep an eye out for when a manufacturer updates them with bug-fixes). If you are seeing issues with performance or stability, you might want to look at trying a VS configuration where you uninstall any additional packages to see if this makes a difference. If so, you can work with the 3rd party manufacturer to identify the issue.
Visual Basic Build Performance HotFix
The Visual Basic team has released several hotfixes for compilation performance issues with large VB projects. You can learn how to obtain these hotfixes immediately from this blog post. The VB team also has a direct email address -- vbperf@microsoft.com -- that you can use to contact them directly if you are running into performance issues.
Subscribe to:
Posts (Atom)